In order to create the best possible sounds of your own, it
is important to know something about digital sound. In this article I will try to explain
to you, in plain English, some things which will hopefully help you a lot.
This document has been divided into several separate parts:
I think both parts contain useful facts, that everyone who uses digital audio to create music should know. So take a look, you'll probably find something worth reading in here ;-)
As
you probably know, sound is air which is moving very quickly. The speed of these movements is called "frequency", which is a very important property of sound, especially music. The frequency of a sound is measured in Hz (=Hertz, named after a man called Hertz :-/ who did a lot of research into sound and acoustics some time ago). Most people can hear frequencies in the range between 100Hz-15000Hz. Some people can hear very high frequencies above 19000Hz, but scientists always assume that the human ear is able to discern frequencies between 20Hz-20000Hz, since those numbers make their calculations a lot easier.-very- low |
A' |
audible |
ouch! |
too high |
Another very important property of sound is its level; most people call it volume. It is measured in dB (=deciBell, named after a man called deciBell (NOT!!) all right, his real name was Bell, but he did invent the telephone and that is why us Dutch people still say 'mag ik hier misschien even bellen?' when they want to use your phone).
So why don't we measure loudness in Bell instead of deciBell?
Well, mainly because your ear really can discern an incredible amount (1.200.000.000.000,
that's 11 zeroes) of different loudness levels, so they had to think of a trick(which I'm
not going to explain here, sorry!) be able to describe an incredible range with only a few
numbers. They agreed to use 10th's of Bells, deciBells, dB, instead of Bells.
Most professional audio equipment uses a VU meter (=Volume Unit meter) which shows you the
input or output level of your equipment. This is very convenient, but only if you know how
to use it: A general rule is to set up the input and output levels of your equipment so
that the loudest part of the piece you want to record/play approaches the 0dB
lights. It is important to stay on the lower side of 0dB, because if you don't, your sound
will be distorted badly and there's no way to restore that. If you're recording to
(analog!) tape, instead of (digital) harddisk, you can increase the levels a bit, there is
enough so-called 'headroom' (=ability to amplify a little more without distortion) to push
the VU-meters to +6dB. There is some more information on calibrating equipment levels inthe recording section below.
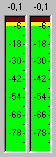
Some examples of different levels, if you'd like to play with them for a while:
maximum level |
half power |
very quiet |
a little too loud-a lot of distortion |
Okay, now that you know the most important things about
sound, let's finally go to the digital bit (ooh, a pun :-/ ): I've just told you about the
properties of 'normal' (analog) sound. Now I'll tell you what the most important
properties of digital sound are.
First of all, the famous 'sample rate'. The sample rate of a piece of digital audio is defined as 'the number of samples recorded per second'. Sample rates are measured in Hz, or kHz (kiloHertz, a thousand samples per second). The most common sample rates used in multimedia applications are:
8000 Hz |
11025 Hz |
22050 Hz |
really yucky |
not much better |
only use it if you have to |
Professionals use higher rates: |
||
32000 Hz |
44100 Hz |
48000 Hz |
only a couple of old samplers |
ahh, what a relief |
some audio cards, DAT recorders |
Some modern equipment has the processing power required to enable even higher rates:
96000Hz or even an awesome 192.000Hz will possibly / probably be the professional (DVD?)
standard rates in couple of years. The advantages of a higher samplerate are simple:
increased sound quality. The disadvantages are also simple: a sample with a higher
samplerate requires an awful lot more disk space than a low-rate sample. But with the
harddisk and CD-R prices of today that isn't too much of a problem anymore.
....But Why?!
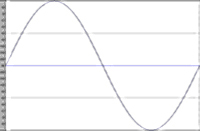
To answer that, let's look at a single period of a simple sine wave:
|
|
When recording a certain frequency, you will need at least (but preferably more than) two samples for each period, to accurately record it's peak and valley. This means you will need a samplerate which is at least (more than) twice as high as the highest frequency you'd like to record, which, for humans, is around 20000Hz. That's why the pro's use 44100Hz or higher as the minimum samplerate! They can record frequencies up to 22050Hz with that. (Now you know why an 8000 Hz sample sounds so horrible: it only plays back a tiny part of what we can hear!)
Using an even higher samplerate, like 96000Hz, you can
record higher frequencies, but you won't hear things like 48000Hz anyway. That's not the
main goal of those super-rates. If you record at 96000Hz, you will have more than four
samples for each 20000Hz period, so the chance of losing high frequencies will decrease
dramatically! It will take quite a few years for consumer level soundcards to support
these numbers, though. There are a few pro cards which already do, but you could easily
buy a small car for the same money...
That's enough about frequency for now. As I said before, another very important property
of sound is its level. Let's have a look at how digital audio cards process the sound
levels.
The capacity of digital audio cards is measured in bits, e.g. 8-bit soundcards, 16-bit soundcards. The number of bits a sound cards can manage tells you something about how accurately it can record sound: it tells you how many differences it can detect. Each extra bit on a sound cards gives you another 6dB of accurately represented sound (Why? Well, Because. It's just a way of nature). This means 8-bit soundcards have a dynamic range(=difference between the softest possible signal and the loudest possible signal) of 8x6dB=48dB. Not a lot, since people can hear up to 120dB. So, people invented 16-bit audio, which gives us 16x6dB=96dB. That's still not 120dB, but as you know, CD's sound really good, compared to tapes. Some freaks, that's including myself ;-) want to be able to make full use of the ear's potentials by spending money on soundcards with 18-bit, 20-bit, or even 24-bit or 32-bit ADC's (Analog to Digital Convertors, the gadgets that create the actual sample) which gives them dynamic ranges of 108dB, 120dB, or even 144dB or 192dB.
Unfortunately, all of the dynamic ranges I mentioned are strictly theoretical maximum levels. There's absolutely not a way in the world you'll get 96dB out of a standard 16-bit multimedia sound card!!! Most professional audio card manufacturers are quite proud of a dynamic range over 90 dB on a 16bit audio card. This is partly because of the fact that it's not that easy to put a lot of electronic components on a small area without a lot of different physical laws trying to get attention. Induction, conduction or even bad connections or (very likely) cheap components simply aren't very friendly to the dynamic range and overall quality of a soundcard. But there's another problem, that will become clear in the next paragraph.
Back in the old days, when the first digital piano's were put on the market, (most of us didn't even live yet) nobody really wanted them. Why not? Such a cool and modern instrument, and you coould even choose a different piano sound!
The problem with those things was that they weren't as sophisticated as today's digital
music equipment. Mainly because they didn't feature as many bits (and so they weren't even
half as dynamic as the real thing) but also because they had a very clearly rough edge at
the end of the samples.
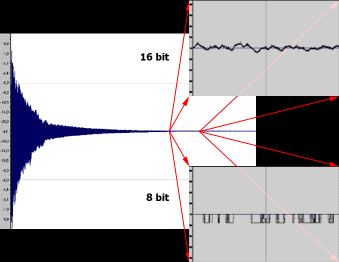 Imagine a piano sample like the one you see here. It slowly
fades out until you here nothing.
Imagine a piano sample like the one you see here. It slowly
fades out until you here nothing.
At least, that's what you'll want... As you can see by looking at the two separate images,
that's not at all what you get... These images both are extreme close-ups of the same area
of the original piano sample. The highest image could be the soft end of a piano tone. The
lowest image however looks more like morse code than a piano sample! the sample has been
converted to 8 bit, which leaves only 256 levels instead of the original 65536. The result
is devastating.
Imagine playing the digital piano in a very soft and subtle way, what'd you get? some
futuristic composition for square waves! That's not what you paid for ;-) This froth is
called quantization noise, because it is noise that is generated by (bad)
quantization.
There is a way to prevent this from happening, though. While sampling the piano, the
soundcard can add a little noise to the signal (about 3-6dB, that's literally a bit of
noise) which will help the signal to become a little louder. That way, it might just be
big enough to get a little more realistic variation instead of a square wave. The funny
part is that you won't hear the noise, because it's so soft and it doesn't change as much
as the recorded signal, so your ears automatically forget it. This technique is called dithering.
It is also used in some graphics programs e.g. for resizing an image.
Another problem with digital audio equipment, is called jitter. Until now, I've always assumed that the soundcard recorded the sample at exactly 44100Hz, taking one sample every 1/44100 second. Unfortunately that is -totally- unreal. There *always* is a tiny timing error which causes the sample to be taken just a little too late or just a little too soon.
Does this make a big difference then? Well, you could start nagging about everything,
but then you'd probably have bought a more expensive soundcard in the first place. The
really bad part is that jitter is frequency dependent. Because it's related to the timing
of the sample, it can change the recorded frequencies just a little. If it records a
sample just a little too soon, the card thinks that the recorded frequency is a little
lower than it really is. This is noticable at frequencies below 5000Hz but especially bad
at the lowest frequencies, because the influence of a little error is much bigger there.
Typical jitter-times go between 1.0 x 10 -9 seconds (that's a
NANOsecond, read:almost nothing) and 1.0 x 10 -7 seconds (that's a
hundred NANOseconds, not a lot more) but they make the difference between a 'pro' sound
and a 'consumer' sound on e.g. different CD-players.
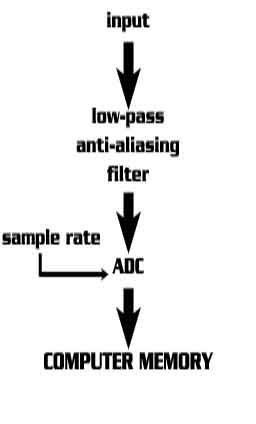
When you record a sample with your sound card, it goes
through a lot of stages before you can store it on your hard disk as a sound file.
Fortunately you don't have to worry about these stages, because modern sound cards and
samplers take care of them for you.
I'm going to be a big bore and tell you about these stages anyway.
Let's see what happens when you press 'rec':
| The sound card starts a very accurate stopwatch (the samplerate). |
|
| Then it transforms the sound coming in: it simply cuts off the very high frequencies which it cannot handle. This cripples the sound a lot, but it is required to prevent even more serious damage to the sound, which would make the sound unrecognizable. This is a low-pass (cut the 'high' frequencies, let the 'low' frequencies pass through) anti-aliasing (smoothing, blurring) filter (because it takes away some parts and leaves the rest) | |
| Every time the stopwatch has completed a cycle, the sound card's ADC looks at the filtered input signal. It calculates how loud the incoming sound is at that exact moment in time (very much like a microphone would measure air pressure) and transforms the loudness level into the nearest digital number. | |
| and shouts that number to the computer, which stores it somewhere in memory, probably on a hard disk. |
Sound card manufacturers put a brickwall-filter (look at the image below!) in their sound
card, to prevent a very nasty side-effect called 'foldover'. Foldover is a pretty
difficult concept, but I'll try to keep it simple.
It's more or less the same thing that happens when you look at a car's wheel when it drives past you very quickly. You'll sometimes see the wheel moving backwards. Another example can be found in old western movies where you'll see a train going by. The 'wheels' of the train will be moving backwards too, if the train's going fast enough.
All these 'illusions' are foldover-effects. They occur when a
fast system at regular intervals analyzes something which is moving even faster than the
system itself.
When recording at 22050Hz, your sound card will simply not be able to record any
frequencies above 11025Hz, because you need at least two samples for each period, as
described above. Without the low-pass filter, the sound card would blindly try to record
those frequencies. But afterwards, when you play back the sample, you'll hear a totally
different frequency instead of the original one. Just like the car's wheel that seems to
be moving backwards, while it really isn't.
(The frequency you'll actually hear equals the sampling frequency minus the original
frequency, e.g. 22050-12050=10000Hz, instead of the original frequency, in this case
12050Hz).
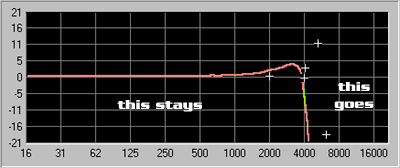 |
a brickwall filter at 4000Hz |
Therefore, the maximum frequency that can be recorded with a certain sample rate, is half the sample rate. That frequency is called the Nyquist frequency, sometimes abbreviated to fN, after a man named Harold Nyquist, who worked at Bell Telephone Laboratories and more or less invented audio sampling. A big guy in digital audio. Anyway, to prevent all that from happening, the sound card manufacturers put a special filter in their card (see figure of brickwall filter on the right).
This low-pass filter removes high frequencies like any equalizer or Hi-Cut Switch does, except it is *much* more agressive. You can see that the filter allows all sound below 1000Hz to pass through, and that it gives the frequency range of 1000Hz-3500Hz a small boost. (This boost is necessary to be able to cut off the higher frequencies with such violence.) Frequencies above 4000Hz are eliminated extremely agressively. That is why they call it a brickwall-filter, because of the wall-like slope.
The filter displayed above might be used for a sample rate of about 8000Hz, since an 8000Hz sample has a Nyquist frequency, the maximum recordable frequency, of 4000Hz. This makes it very important to choose the appropriate sample rate for your sample; that is, if you've got a legitimate reason not to record at 44100Hz, or higher ;-)
Let's go through this step by step.
We'll start by selecting File->New, somthing which every sample editor I know can handle ;-). You'll want to select the number of bits you'll want to use for each sample. You'll also want to select the sample rate. My advice is: pick the highest your hardware can handle. That is most likely 16 bits at 44100Hz, since most, if not all, consumer sound cards support CD-quality playback & record.
 |
 |
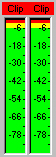 |
Then let the band, or whatever, play for a while, to see if you're recording levels aren't too high or too low. Your program probably supports input monitoring and If if yours doesn't, it should! Get yourself another program ;-) You'll probably see a variant of the good ole VU-meter I like the one to the right. The loudest part of the sound you want to capture to disk should be somewhere very near 0.0dB, but it should not, ever, never ever!! exceed 0.0dB, since that results in very nasty distortion, which is cool on analog recorders but really horrible in the digital world.
If you want that distortion efftect, get a program to do it for you, but don't record at a too high level! Sonic Foundry's Sound Forge has a really good Distortion feature. Also, there are lots of Direct-X plugins which emulate tube compression and tape saturation etc. This type of digital distortion is called 'clipping' because all samples that exceed the maximum level are 'clipped', (cut off and reduced) to the maximum level.
Don't set your recording levels too low, though.It will
further reduce the accuracy of your home recording, since mutimedia cards already add a
very significant bit of noise. In fact, they sometimes hardly leave you any dynamic range
at all!
So, be very picky about your input levels.
Next, think about the source of your recording. A microphone? A keyboard or synthesizer? a
DAT-tape? If the source already is digital, like with DAT and CD, please go ahead and stay
digital! Use a digital connection between the DAT and the soundcard, to prevent the
operation of digital-to-analog conversion -> transmission through a cheap cable ->
analog-to-digital conversion from adding noise or distortion!
If you're recording with a microphone, first let the
microphone record a minute or so of 'silence'. Then play that recorded 'silence' back over
headphones and listen the amount of noise coming from the room. Be sure to keep this data,
because some good programs can eliminate that noise from the actual recording, by using
the data as a 'noise print' (They analize the noise print data and then 'subtract' it from
the real recording. Sound Forge and CoolEdit have this great feature.)
Also, if you have the opportunity, try several different microphones for the same
recording. Learn to trust your ears. If you have several different recordings of the same
event, pick the one that sounds best. Don't automatically pick the one recorded by the
most expensive mic. That! Does! Not! Work! Pick the one that sounds best. You'll be
surprised to hear the number of top hits being recorded with cheap mics. But I'm not
saying you should be using cheap mics... There are several pretty good all-round
microphones available from $30 (like the Behringer XM-2000). A really good mic for vocals
and guitar is the SM-58 by Shure. These are a little more expensive (over $100), but they
are used all over the world in pro studio's. The problem with these microphones is,
you'll need a pre-amplifier too, because the original microphone signal is very weak, and
an 'XLR-cable' to connect it to your gear. Most mixers have microphone pre-amps on them.
If you're looking for a good value-for-money mixer, I suggest you take a look at Behringer's website. They're not 100%
top quality, but if 90% is good enough for you (It's that last 10% of perfection which
makes audio equipment so darn expensive) Behringer is the place to be. No, I'm not
getting payed to tell you this ;-)
If you're recording from a different piece of hardware e.g. directly from
synthesizer/keyboard, check your manual to see if your hardware has balanced outputs. If
it does, you'll need to get/make two stereo jack plugs and three wires of the same length,
or even better: an insulated cable with three separately insulated wires (that's a
multi-buck issue, though...) to make sure your audio isn't distorted before it goes into
your sound card's inputs.
A normal wire has 1) a signal wire and 2) a ground wire. If you use normal wire over long distances, preferably close to stage lighting ;-) you'll notice the wire picks up an awful lot of noise and buzzing on the way. This has something to do with induction and magnetic fields but all you'll need to know is that it sucks. To prevent such 50Hz (AC power!) buzzing, the professionals use balanced cables.
The balanced cable system is a very nice way of connecting equipment over long distances without loss of sound quality or unwanted induction. This is possible because a balanced cable has three wires instead of two: 1) a signal wire, 2) an inverted signal wire and 3) a ground wire. At the output of the synthesizer / mixer / whatever, the output signal is routed to both the signal-wire and the inverted-signal-wire.
The signal going to the inverted signal wire is then inverted
(multiplied by -1, turned upside down, given a phaseshift of 180 degrees) and transported
together with the signal wire all the way through the cable to the other connector and on
the way, both wires pick up all the usual noise and humms. But when the signal arrives at
its destination, the inverted signal is inverted again, so that the signal it was carrying
is back to normal again. But this inversion also inverts the noise and buzz, so now
we have: a signal wire with 1) the signal and 2) the noise, and we have the
re-inverted(=normal!) wire with 1)the signal and 2)the inverted noise. These two
are mixed together by the equipment: signal + signal + noise - noise, which gives twice
the signal strength and no noise whatsoever!
Well, If you're interested in reading more on (digital) audio, there's a lot of sites to
visit. I suggest you try some of them:
I've really enjoyed writing this article. I think there will
be more to come, if it's okay with Thomas :-)
You can contact me with questions at the email adress below. Tell me what you think of
this article, I'd like to know.
Mazzel!
Joost Boomkamp
Student of Sound Design
Student of Sound & Music Software Development
Utrecht School of the Arts
fac: Art, Media & Technology
dep: Music Technology & Audio Design
e-mail: joost.boomkamp@student-kmt.hku.nl